Materials required for the dryer are:
1 sheet of 3/4 in. plywood
2 two-by-fours, 8 ft. ea.
1 piece 3/8 in. plywood, 10 x 32 1/2 in.
1 piece of 1 x 4, 8 ft. (or substitute two pieces of 3/8 in plywood, 13 3/8 in. x 36 in.)
4 sheets HDF (high density fiberboard) (or Masonite) 1/4 in. thick, smooth on both sides.
11 pieces of corrugated cardboard, 45 x 32 inches. Make sure the corrugations run along the long dimension. I ordered mine from www.uline.com, in 4x8 foot sheets, however salvage cardboard in good shape would work fine.
22 blotters. I used the 40x60 "Cosmos" blotters (Item #60138) from Graphic Chemical. Anything similar would work.
4 ratchet tie-down straps, 10 ft long.
1 bathroom exhaust fan
2in. and 2 1/2 in. drywall screws
carpenter's glue
2 pairs "hook & eye" hardware (for permanent attachment use screws)
Cut-list for Stack Assembly:
| 3/4
in. plywood: 1 piece 45 x 32 in. - for top cover of stack. 1 piece 48 x 32 in. - for bottom of stack. 2 pieces 3 x 12 in. - for stacking guides, on back side of dryer. |
2x4's: 4 pieces, 41 in. long - attach to top and bottom of dryer. 2 pieces, 9 1/4 in. long - for bottom part of stacking guides on back edge of dryer. |
1x4 wood: 8 pieces, each 10 3/8 in. long. - for inserting between the 2x4's that run along the top and bottom of the dryer. Note: A simpler option would be to substitute a piece of 3/8 in plywood, 13 3/8 x 36 in. attached to the top of the 2x4's on top and bottom of the dryer. |
| Masonite: 1/4 in. thick, smooth on both sides. Also called "HDF" (high density fiberboard). 12 pieces, 45 x 32 in. (cut 3 pieces from each 4x8 ft. sheet-the 32 in. dimension will be a bit short) |
Corrugated Cardboard: 11 pieces, 45x32 in. with corrugations running along long dimension. |
Blotters: 22 pieces, 45x32 in. Attach at corners or edges with tape or glue on both sides of the corrugated cardboard, to keep the cardboard from pressing a pattern into the prints. |
Cut-list for Exhaust Fan Assembly:
| 3/4 in.
plywood: 1 piece 11 x 32 in. for back, cut out hole and mount exhaust fan in center of this piece. 1 piece 4 x 32 in. for top. 2 pieces 5 x 11 3/4 in. for sides. Cut a groove 1/2 in. wide and 1/4 in. deep 1/2 in. in from the long edge for the 3/8 in. piece of plywood ("slider") to slide in. 2 pieces 11 x 2 1/2 in. for spacers. (see picture of fan assembly) |
3/8 in. plywood: 1 piece, 10 x 32 1/2 in. for slider. |
| Fan Assembly, with slider | Fan Assembly, slider removed |
 |
 |
Assembly Instructions:
| For
Stack Assembly: Attach the 41 in. 2x4's to the top and bottom pieces of 3/4 in. plywood. Locate them at 2 in. from the back edge, 2 in. from front edge top (5 in. from front edge of bottom). Outside edge of 2x4 should be 9 1/4 in. from long edge of plywood. Attach the 8 pieces of 1x4; 4 on top and 4 on bottom. Locate along 2x4's on centers at 4in., 15 in., 26 in., and 37 in. Or (simpler option) cut a piece of plywood 13 3/8 x 36 in. and screw it on to the tops of the 2x4's. Guides: You need guides to get a straight stack for the exhaust-fan assembly to fit over. Attach one end of one of the two 3x12 in. 3/4 in. plywood pieces to one end of one of the two 9 1/4 in. pieces of 2x4, so that the plywood laps the end of the 2x4 to form a "L"-shaped piece. Do the same with the other two pieces. On the 3/4 in. plywood bottom of the stack, locate the stack guides on centers 13 in. down from the front and 9 1/2 in. up from the back along the back edge of the dryer base. Attach with screws, or (to be removable) with hook and eyes. To define the ledge where the exhaust fan assembly will sit, draw a line with a sharpie pen (or something similar) 3 inches back from the 32 in. long front edge of the stack bottom. This will define the area where the layers of Masonite and cardboard are placed, an area congruent with the size and placement of the 3/4 in. plywood top of the dryer. |
| For
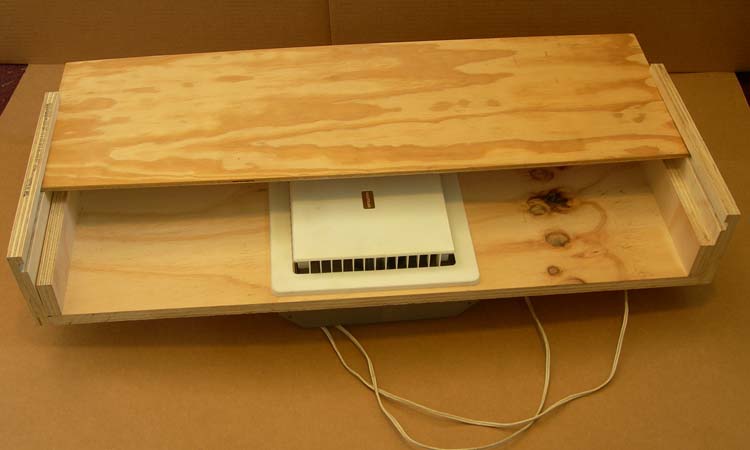
Exhaust Fan Assembly: Measure, mark and cut a hole for mounting the exhaust fan in the 11 x 32 in. piece of 3/4 in. plywood. Attach the top piece so that it laps the back piece. Attach the two side pieces so that they lap the back piece and the top. Attach the side pieces with screws only along the edge adjoining the back, leaving the edge adjoining the top free so that the side pieces can spread apart slightly if necessary to fit over the end of the stack of boards, blotters and cardboard. Attach the 11 x 2 1/2 in. pieces of 3/4 in. plywood (spacers) with screws through the back. Mount the exhaust fan. These are usually designed to be attached to a 2x4 wall or ceiling stud and fit flush with 1/2 in. drywall. In this case there is no stud, and in stead of drywall there is 3/4 in. plywood. Take the blower and motor out of the metal box. Secure the fan by drilling a hole in the center of each side of the metal fan enclosure, 3/8 in. from the edge where it mates with the edge of the plywood. Insert screws through the holes into the plywood to secure the fan. |
General Use:
| Assemble the layers so that starting at
the
bottom,
there is a layer of Masonite, then a layer of cardboard with blotter on
either side, Masonite, cardboard & blotter, etc. Place each
layer
against the two stack guides on the back of the stack, in the 32 x 45
in. area defined by the line drawn across the plywood bottom of the
stack. There should
be Masonite next to both the plywood top and bottom. The damp
prints are sandwiched between the Masonite and a blotter, so this
arrangement has a capacity of 22 layers of prints per dryer-load.
It doesn't matter if the face of a print is next to Masonite
or
next to a blotter. Try to keep the prints distributed as evenly as
possible over
each layer as you load the dryer. I usually don't cover the
prints in the dryer with tissue paper, but do so if I'm worried about
ink transferring. Make sure the tissue paper doesn't have any
folds or creases , or these can leave a pattern in the paper of the
print. Don't allow tissue paper to be pressed into heavy
deposits
of ink on a print long enough for the ink to dry hard, because then you
won't be able to get the tissue paper separated from it. There is room
for the capacity of this dryer to be approximately doubled by adding
more layers of cardboard, blotters and Masonite. I use the Masonite as
it comes from the store, and have never had any problems with stains or
anything transferring from the Masonite to a damp print.
However,
it would make added protection for the prints and would make the dryer
work a little bit more efficiently if you were to coat the Masonite
with some kind of matte shellac or oil-based (waterproof)
white
paint. Spray it on rather than brushing it on, or brush it on and
lightly sand it. Brush marks might press into a print. The
dryer
would work more efficiently because untreated Masonite absorbs a small
amount of moisture from the print, which has to migrate back
through the print and blotter to be removed by the air flowing through
the cardboard before everything's dry. If the Masonite were
sealed with a moisture barrier, the moisture would be isolated closer
to the airflow. When the dryer is loaded and the straps are cinched down (they don't have to be extremely tight) set the fan assembly in place. The sides should lap the end of the stack, the spacers should be against the end of the stack, the back of the box should be flush with the edge of the plywood bottom and the slider should be sitting on the top of the dryer. Turn the exhaust fan on to draw air through the stack. I have the fan on a timer switch, and set it for 4 hours. That's usually long enough to completely dry a load of prints. Drying time can be affected by wetness of prints going in, relative humidity in the room, etc. They usually end up staying in the dryer overnight or longer, and if so I usually run the fan for a while periodically just to help ensure good drying. When printing, I usually take the wet print out of the press and lay it face up on a piece of plastic. I lay a piece of tissue on top of it, and cover it with a large clear plastic bag to keep it from drying out. I accumulate the day's prints this way, stacked wet with tissue between them and covered with plastic. I leave them overnight to allow the ink to partially oxidize and put them in the dryer the following day. If prints have lines or areas with heavy ink or unusually slow-drying ink, I may leave them in the wet stack an extra day or two; possibly changing the tissue paper before putting them in the dryer. In extreme cases, it may be necessary to air-dry the prints and let the ink harden, then dampen the backs with a sponge and flatten the prints. Most of the time prints can go into the dryer immediately after finishing printing without ink-transfer problems. |